Tuesday, September 29, 2009

Some Favorites

How's your day going?
I sure can tell you that a bunch of us here in California are loving this cooler weather!!
Now I don't mind doing a little housework since it isn't smoking hot!
I'll just dust around and while doing so snap a few pics of some of my favorite pieces, like this sweet little chalkware girl.....
....and my antique powder boxes that are also music boxes. They have a wonderful patina on them...
....and interesting designs on the top, like the crown on the one above.

This little plateau mirror holds old rouge compacts, perfume bottles, a holy water bottle and other religious pieces.
My favorite colors.....silver, blues and red.

The chalkware piece below was a recent estate sale find.


I am in love with these old bindings and the textures of old books.

Praying that you are all fine....
.....and have a good night!

Sunday, September 27, 2009

Beautiful....

Beautiful flowers...
....to brighten your day....
....whether you like pastels....
or reds.....
....these are for you.....
.....because YOU are beautiful.
Psalms 139:14
I will give thanks to You, for I am fearfully and wonderfully made; Wonderful are Your works, And my soul knows it very well.

Friday, September 25, 2009

Cute Things For Sale....

....on my ETSY. Still working on getting a bunch of little things listed today. Some of these items are already on my ETSY site....and others will be there shortly.

...sweet little deer planter...

...old metal children's toy dishes...

...salt and pepper shakers...

...cute little metal french fry tray...

....romantic salt and pepper shakers...

...sweet Southern Belle planter...

....heavy metal dog bookends...


....and this sweet face - who could resist this?

And lastly, a favorite vintage floral by Georgia Caldwell.


Have a sweet weekend!!

Tuesday, September 22, 2009

Flirty and Skirty Slipcovers & Tutorial

Voila! They are finally done! All four slipcovers for my new/old and refurbished dining room chairs. (I posted about them back here). I'll take more photos later of the room, but for now I will share the process with you.

When I walk you through the instructions how to make these, I will refer to the back skirt as the small section of skirt that is at the back of the chair. The other part of the skirt I will refer to as the full skirt - the piece that goes around the two sides and along the front.
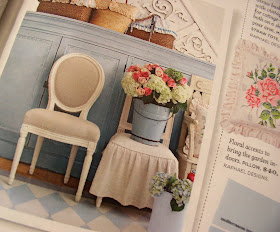
My inspiration.....
....came from an issue of Country Living magazine. The slipcover above was designed by Raphael Designs. They have a wonderful website where you can purchase custom slipcovers, however I am doing this project on a small budget so I opted to make them myself.
This is the finished chair. I painted the wood a creamy white then sanded the edges here and there. To give the carvings some depth, I applied a very small amount of Brie wax that is an oak color.
I used drop cloth fabric to cover the seats with and glued on a natural colored braid that was purchased at JoAnn's fabrics. To make the drop cloth fabric really soft (it can be very course), wash it a couple of times and each time add about 2 or so cups of fabric softner to the rinse cycle.


My vision was to have a fun and feminine skirt with lots of pleating....and for the chair to be able to "show a little leg" from underneath.
Ready to design?


I think that the most difficult part was making the pattern for the seat.
For the paper I used a roll of the brown paper that is used to wrap parcels with.
Cut out a piece of the paper that is larger than the seat of the chair and lay it over the seat.
I molded the paper to the seat by running my finger along the edge and crimped the shape.
Use a pencil to draw the lines where you have crimped.

When cutting the actual seat pattern out, add about 5/8" to the edges. This will allow for your seam allowance.


Below is the seat piece. See the top portion? To make a finished edge (the part that goes next to the ladder back of the chair) fold over about 1/8" twice and then top stitch. note: I did not clip the curved edge being as the fabric tends to unravel rather easily.
You will cut out a back skirt piece and a full skirt piece. (please see the first photo for reference).

To figure out the size of these pieces, measure the length where the back skirt and full skirt will be attached. Double this measurement. I added one inch at both sides to allow for the finished edges.

Measure how far down you want the skirt to go and also add one inch for the finished edge.

The diminsions for mine were:
Back skirt: 25 inches long and 16 inches in length.
Full skirt: 96 inches long and 16 inches in length.
Ties (four per slipcover): 5 inches wide and 25 inches in length.
To hem the edges, turn over 1/4" and then 1/4" again and stitch.
Below you can see where the skirt was attached to the seat piece. What I did when attaching the skirts, I pinned each end to each side. This will give you an idea of how much of the fabric is left at each side when doing your hand pleating. I cannot tell you how much this tip helps. It will save you time so that you won't have to pin and then un-pin the pleats.
I hand pleated the skirts with random pleating. When folding the pleats, alter the direction of the pleat so that you will get a fuller pleated look.
I like the look of an edge with cording, however I wanted a softer edge. I also find that cording wears out faster.
For the edges, I sewed the piece with a rounded edge...
...by gathering the pleats in this fashion. To do this, when you come to the corners, just make a small curve in the seam, not a sharp corner.
Above is the finished hem.
Below is what the back skirt looks like once attached.
I didn't take a photo of how to make the ties, but what I did was to cut out four ties per chair. To finish the edges of the ties, turn over 1/4" and press down and then turn over another 1/4" and stitch. To make this easier to stitch, I finished ONE end first and then the sides. You will ONLY need to finish one of the ends as the other end will be attached to the body of the skirt.
To attach the ties, turn the slipcover over so that the "wrong" side is facing you, as above.
Place the RIGHT side of the tie to the WRONG side of the slipcover. Align the edges, pin and sew, as also shown below.
I used 1/4" seam allowances and double stitched the seams. Finish off the raw edges with a zig-zag stitch or use a surger. You will want to finish the edges as this fabric unravels very easily.
Now I must say that Duhgall and Fiona were very well behaved as I stayed busy sewing....

.....and Miss Fiona insisted on sitting in front of me as I took the final photos. She is such a poser!!!

So this is it.....

...now run along and get busy!!


I hope that my instructions make sense. If not, you can always send me an email. Really, these are not hard to do, just time consuming. But well worth it when you can say, "I did it myself!"


Saturday, September 19, 2009

Guy Time

What to do on a Friday afternoon?
Well, my hubby and youngest son decided to leave work early
and head over for lunch at a favorite San Francisco eatery.
A total guy time kind of a day - and that was fine - they need the time together to be ...well, you know....just guys.
So these photos are from the behind the lens of my husband - with his new zippy-d0-wow Canon camera. So come along for a little of what they took in for the day. Above is Alcatraz Island in San Francisco.
Some boats on the water.....
...and my sweet son just taking it all in.


Of course, if you have been to San Francisco, this Ghiradelli landmark will be quite familiar to you. Oh, and the chocolate shop - a must go to!!! But I don't think the boys did that today...only with mom.
They did take some time to visit the graveyard at the Presidio. It is breathtaking....
a quiet memorial to those who have served our country.
Makes me stop and think about each special person who was layed to rest here. Who were they and what stories do they have to tell to all of us?
.....sigh.....

As they leave San Francisco, they take a pause to look over the skyline....
.....and to take a photo of the Golden Gate bridge.
This side of the bridge is on the Marin Headlands, which had a fire going on on this particular day...hence the haze.
Further up Highway 1 leads to Point Reyes and the famous Point Reyes lighthouse.
The drive there is breathtaking with the old and gnarly cypress trees that create a canopy over sections of the road.
Ahhhh...the beauty of nature. God was sneaking in rays of light through the trees just to marvel at. Funny how He gives us moments like this that just simply take our breath away. Makes me think of Heaven shining down on earth.....just to give us hope and joy.
....yes.....a little Heaven on earth going on here. Spencer wanted my husband to take a photo of this because he thought it was pure magical how the sun's rays peaked throught the mossy limbs of the trees.
This is the Point Reyes lighthouse. See all of those stairs?
I remember one time carrying Jordan down these stairs when he was about 2 years old. Dad carried him back up....
A closer view of what lies below....
....and what lies above.


....A penny for your thoughts....
.......as you take in the beauty of the day.


A little visitor to bid you adieu.....

....and happy trails to you......

....until we meet again.